
Truck Bed Drawer System Planning
How to plan a truck bed drawer system.
Plan the truck geometry, vehicle attachment, complete system weight, drawer modules, rail path, frame stiffness, locks, cargo restraint, tailgate access, weather exposure, service removal, and slide selection before cutting the deck. This page covers the system; the product-selection guide covers the slide pair.
- Published by
- COREAX
- Technical review
- COREAX Product Support
- Published
- Updated
Direct answer
Freeze the system geometry before selecting drawer-slide length.
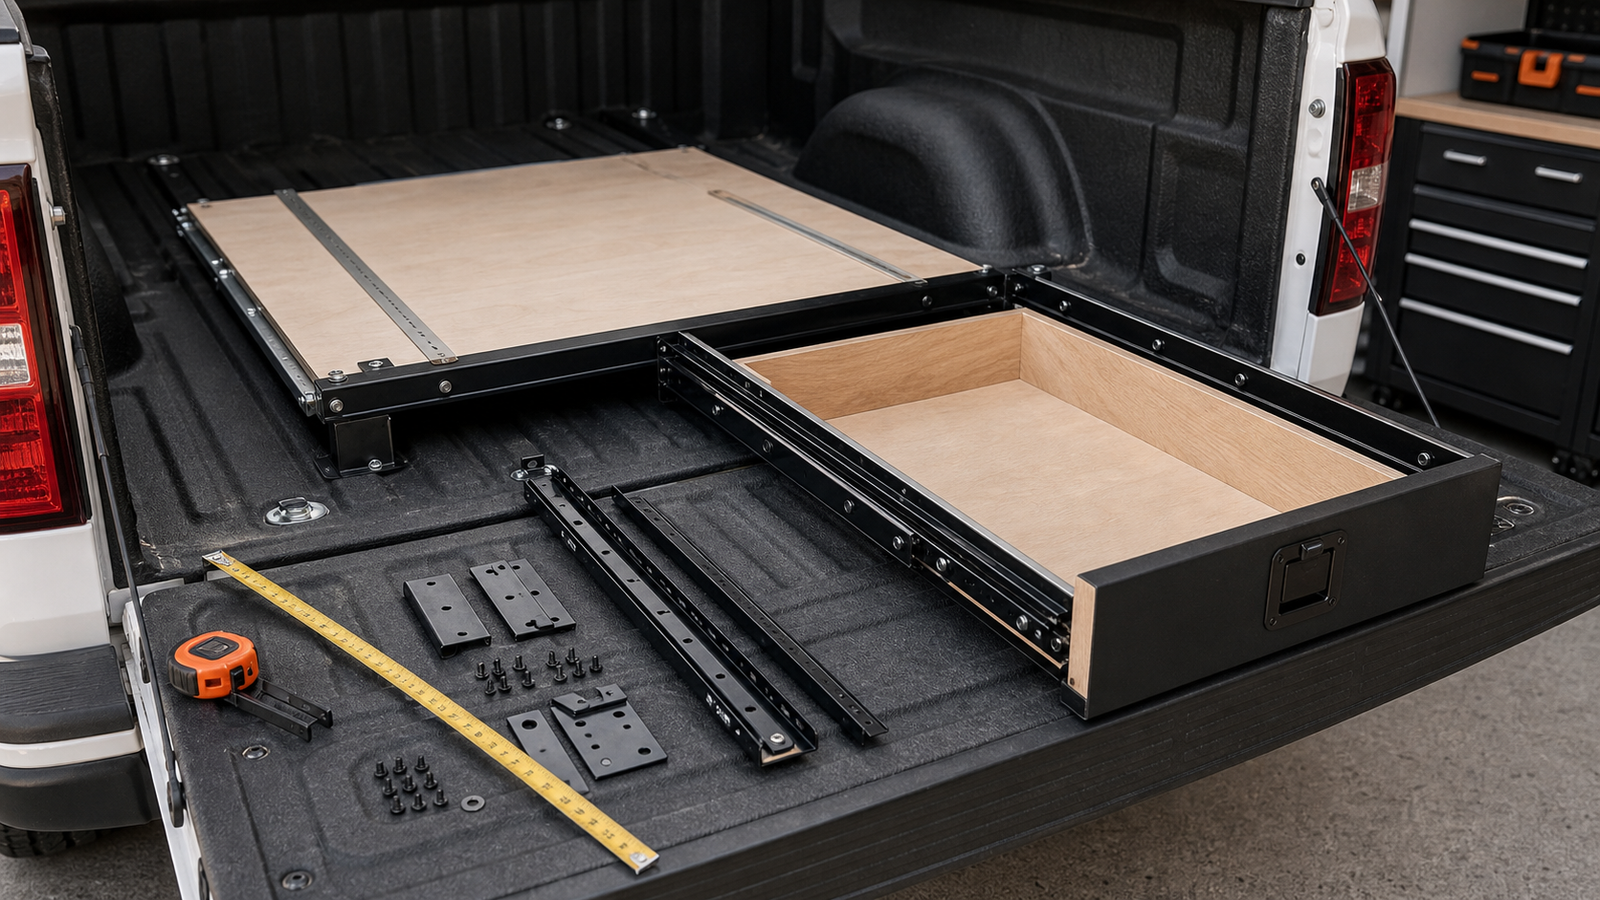
Measure the bed at the height where the drawer frame will sit, including wheel wells, tailgate opening, bed taper, liners, ribs, tie-downs, tonneau or cap structure, and factory service access. Decide whether the system is permanent, removable, or modular. Calculate frame, drawer, hardware, equipment, and cargo weight. Then allocate drawer width, slide space, frame members, tailgate clearance, and user access.
The former broad truck-bed hardware checklist belongs inside this planning sequence: rails, locks, latches, fasteners, dividers, tie-downs, fridge trays, and work surfaces should be selected after their module and failure consequence are defined.
Vehicle boundary
Start with what the truck permits.
A drawer system changes payload, rear-axle loading, cargo attachment, bed access, and sometimes crash behavior. Review the vehicle owner’s information and qualified upfitter guidance. Do not drill until the locations of wiring, fuel and brake lines, sensors, airbags, body mounts, drains, spare-tire mechanisms, and structural members are understood.
Geometry worksheet
Measure the bed where the frame and drawers actually pass.
| Dimension | Measure at | Planning effect |
|---|---|---|
| Usable bed depth | Left/right planned rail lines, from closed face to rear obstruction | Maximum frame and closed-slide length |
| Tailgate opening width | At drawer-face and rail heights | Maximum removable drawer or face width |
| Bed width between wheel wells | Front, middle, rear and at frame height | Drawer count, frame-member width, side storage |
| Bed-side taper | Multiple points along depth | Prevents a square module from binding in a tapered bed |
| Vertical clearance | Bed floor to tonneau, cap, or cargo cover at multiple positions | Drawer height, deck, fridge, stacked bins, sleeping platform |
| Tailgate projection | Closed drawer face to outside working edge | Required full extension or over-travel for kitchen/fridge access |
| Wheel-well envelope | Width, height, front/rear position | Frame shape, side cubbies, drawer width and service space |
| Factory tie-down and bolt locations | Relative to frame members | Attachment brackets and removable-module design |
Make a full-size floor plan and side elevation. Cardboard or temporary timber rails can reveal tailgate, hatch, fridge lid, and user-standing conflicts before material is committed.
Module layout
Design drawers by access frequency and load density.
System weight
Calculate the empty system before allocating payload to cargo.
Heavy plywood, steel frames, two long slide pairs, a fridge, water, batteries, and dense recovery tools can consume a large part of the truck’s available payload. Consider whether every component needs to slide. A fixed water tank or battery enclosure can be lighter and more secure than a moving platform.
Frame design
The frame must keep the rails parallel while the truck and drawer move.
Slide rails need straight mounting faces. A drawer frame also needs enough torsional stiffness to resist one-side pulling, uneven cargo, and road vibration. Plywood, aluminum extrusion, steel tube, and mixed-material frames each have different joints, corrosion behavior, repair methods, and weight.
- Use continuous or well-supported vertical rail faces.
- Measure rail spacing at front, middle, and rear after the frame is attached to the truck.
- Prevent fasteners from pulling thin panels inward.
- Support long drawer bottoms against sag and cargo point loads.
- Provide cross-bracing or diaphragm action against racking.
- Allow drainage, cleaning, and inspection around the frame.
- Design removable panels for slide, latch, and vehicle-bolt service.
Slide selection boundary
System planning decides what the slide must do.
After geometry and load are defined, use Best Drawer Slides for Truck Bed Drawers and How to Choose Heavy-Duty Drawer Slides. The product decision should answer length, complete moving load, selected-size rating, mobile condition, side space, lock behavior, release access, and frame compatibility.
Drawer width
Build the drawer after measuring the installed rail pair.
LD2053 and L2576 use approximately 19 mm of side space per rail, or about 38 mm for the pair before any tolerance or release envelope. Measure the opening at rail height after the frame is installed in the truck. Use the narrowest front/middle/rear reading and subtract both actual rail thicknesses.
Use the side-clearance guide before finalizing the drawer box.
Locks and cargo
Secure the slide, drawer, and internal load separately.
Weather and contamination
Truck beds expose hardware to dust, water, and abrasive cargo.
Plan seals, drainage, ventilation, corrosion protection, and cleaning access. A tailgate seal can reduce dust while changing closing force. Water from coolers, rain, or wet recovery gear should not remain against untreated plywood or pool around bearings. Metal swarf from fabrication must be removed from the slides.
- Protect panel edges and drilled metal.
- Keep drain paths open and away from electrical equipment.
- Use removable liners for mud, sand, food, and oil.
- Inspect locks and bearings after dusty or wet trips.
- Choose fastener and hardware finishes for the real exposure.
- Do not pressure-wash bearings or electrical components without product approval.
Service and removal
Design a recovery path for a jammed or damaged drawer.
A drawer can fail closed with critical tools inside. Provide access to fasteners, release levers, custom linkage joints, and vehicle attachment. Record the rail SKU, length, drawer width, and installation order. Consider how to secure a failed drawer closed for travel and how to remove cargo when the normal release does not work.
Build order
Test the unfinished system in the truck.
- 01Document vehicle limits and attachment zones
Confirm payload, bed structure, factory points, utilities, and prohibited drilling areas.
- 02Mock up system geometry
Test tailgate, hatch, tonneau, fridge lid, user access, and service removal with full-size templates.
- 03Calculate empty and loaded system weight
Revise material and module choices before adding unnecessary heavy hardware.
- 04Build and attach the frame
Measure installed rail faces for straightness and parallelism before drawer construction.
- 05Install rails and prototype drawers
Cycle empty, verify locks and release access, then add representative load gradually.
- 06Add faces, seals, dividers, and finishes
Retest after each item because they can change clearance, force, and access.
- 07Inspect after road use
Check fasteners, frame movement, seals, cargo shift, lock engagement, and rail contamination.
Evidence and vehicle boundary
Mobile ratings and fastener data are conditional.
Manufacturer sourcesAccuride’s mobile-application information and 9300 family show that slide length, drawer width, vibration, mobile rating, and lock configuration require explicit review. Simpson Strong-Tie’s fastener guide publishes substrate, load, spacing, corrosion, and installation information by fastener rather than treating all screws as interchangeable.
- Accuride Mobile Applications GuideManufacturer mobile-application guidance covering model selection, vibration, drawer geometry, locking, and application testing.
- Simpson Strong-Tie Fastening Systems Technical GuideOfficial fastener load, material, spacing, corrosion, and installation data.
Evidence boundary: This page is not vehicle engineering, payload certification, crash testing, or an attachment design for a specific truck. Follow the truck manufacturer and qualified upfitter guidance. COREAX specifications apply only to selected products and do not approve the completed vehicle system.
COREAX fit support
Send the system geometry before asking for a slide size.
Provide truck year/model, usable bed depth at both rail lines, opening width at rail height, drawer count and width, complete moving load per drawer, frame material, tailgate/cover arrangement, required lock and release method, and photos of attachment and obstruction zones.
Common questions
Truck bed drawer planning FAQ
Should I choose drawer slides before designing the truck-bed frame?
No. Define the bed geometry, system weight, drawer modules, mounting faces, and required access first. Then select a slide whose length, side space, rating, lock, and release fit the system.
How much width do heavy-duty slides consume?
COREAX LD2053 and L2576 require approximately 19 mm per rail, or about 38 mm for the pair, before any installation tolerance or release/linkage envelope.
Are two narrow drawers better than one wide drawer?
They reduce each drawer’s width and can improve organization, but add rails, faces, locks, frame members, cost, and system weight. Compare the complete system.
Can I bolt the drawer system anywhere in the truck bed?
No. Use vehicle-appropriate attachment locations and avoid hidden wiring, fuel/brake lines, sensors, drains, and weak sheet metal. Follow manufacturer or qualified upfitter guidance.
Absorbed the broad truck hardware guide and rebuilt the canonical page around vehicle limits, bed geometry, module layout, system weight, frame stiffness, slide boundary, clearance, layered restraint, weather, service, build order, sources, and FAQ.
Move to the next decision.
Use the next guide in the same planning path, then verify the exact product before ordering.