
DIY Linkage Guide
How to build a DIY one-hand linkage for COREAX 76mm locking drawer slides.
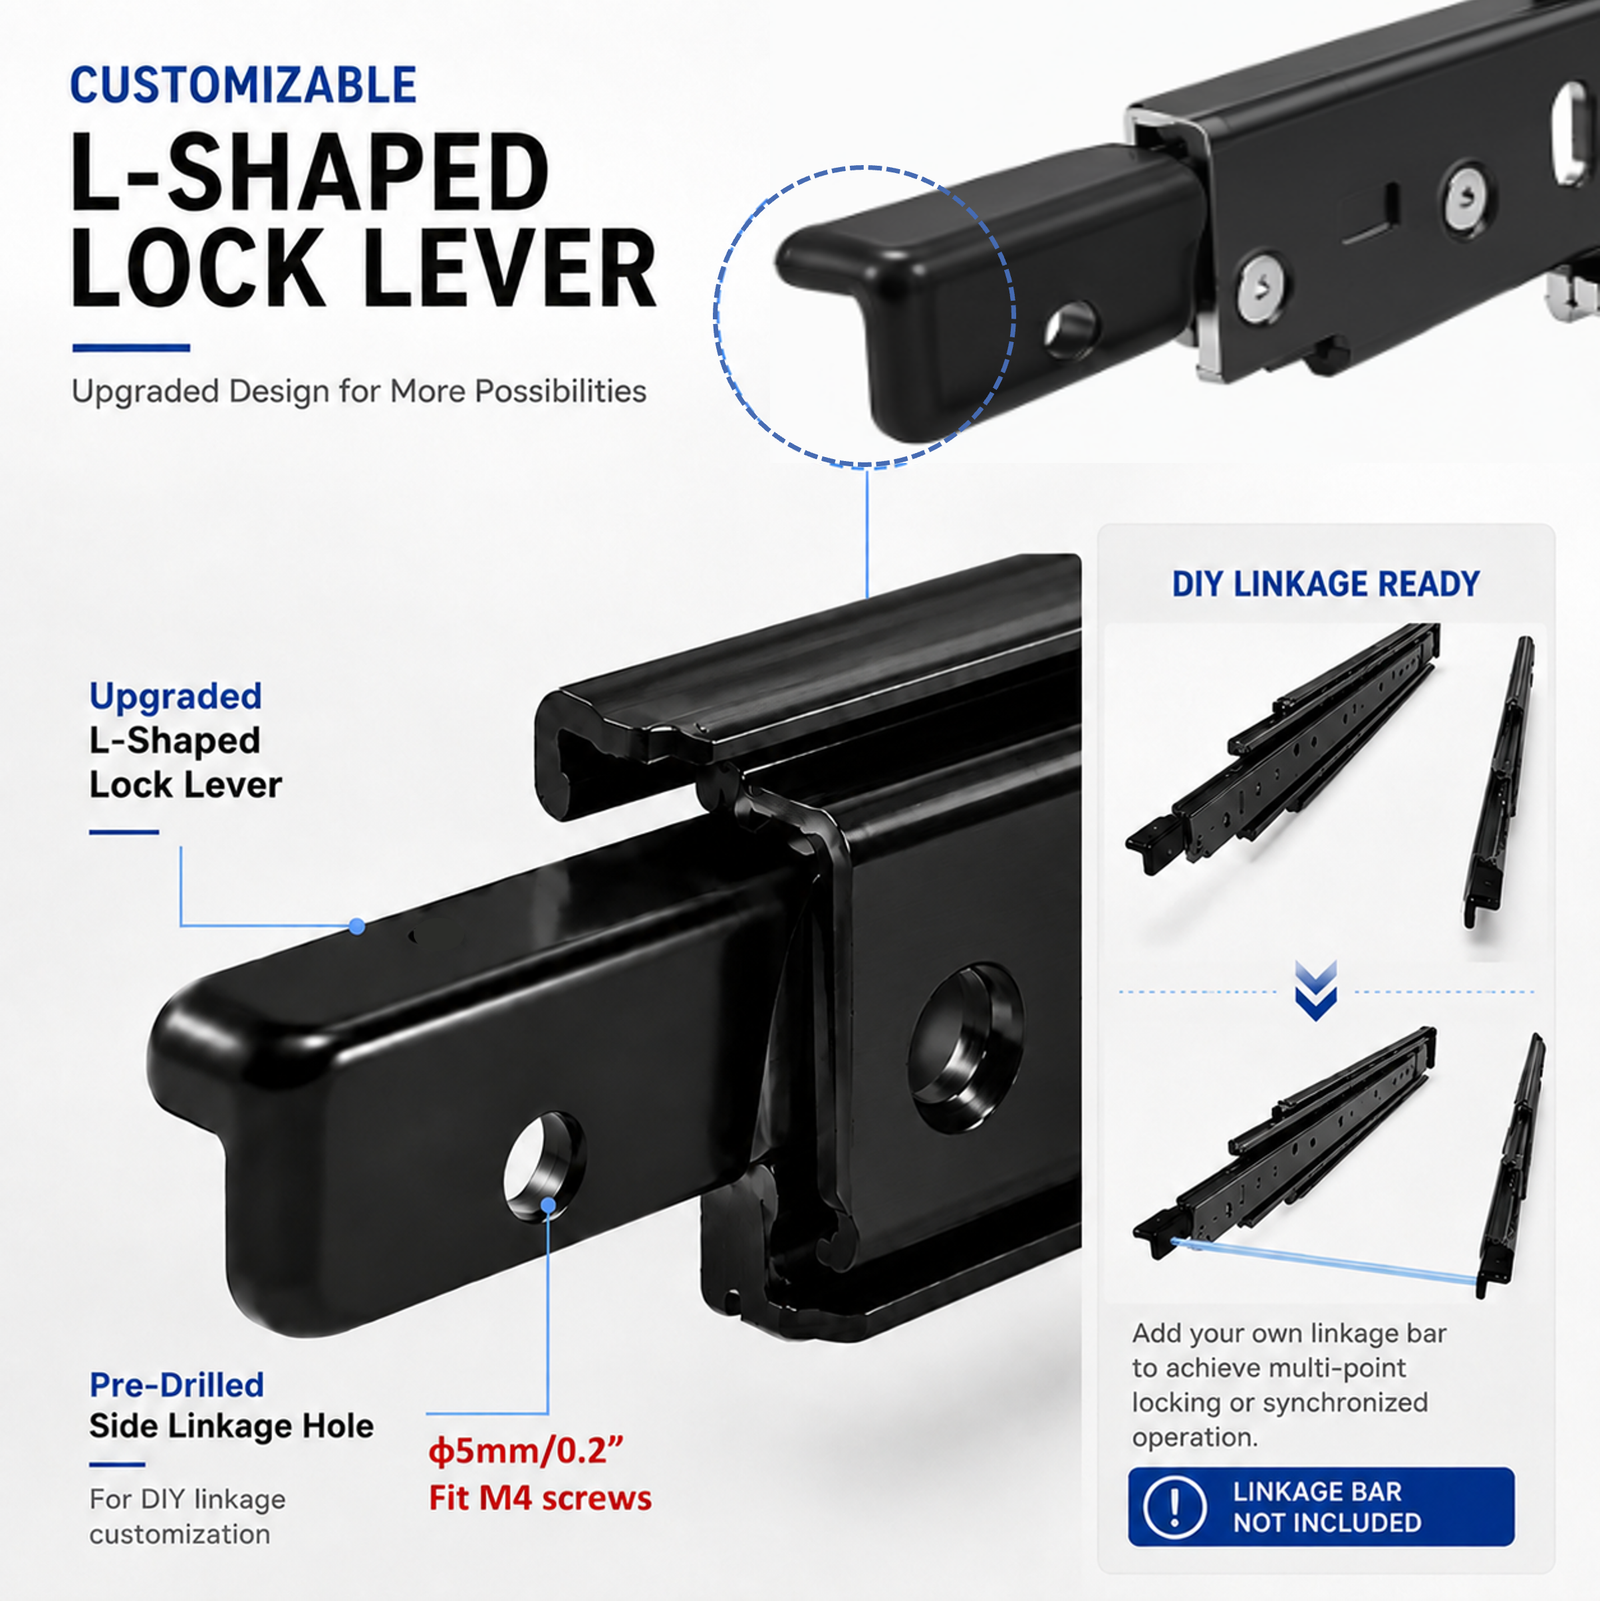
If you have our L2576 slides in front of you and are wondering what to do with the 5mm holes in the L-shaped lock levers, this is the guide. The slides do not include a crossbar. You make the linkage to suit your drawer width, handle position, and build. Below are two real products from other builders and hardware suppliers that show two sensible ways to do it, followed by several simpler alternatives.
- Published by
- COREAX
- Technical review
- COREAX Product Support
- Published
- Updated
What you are actually building
The goal is simple: make both lock levers move together.
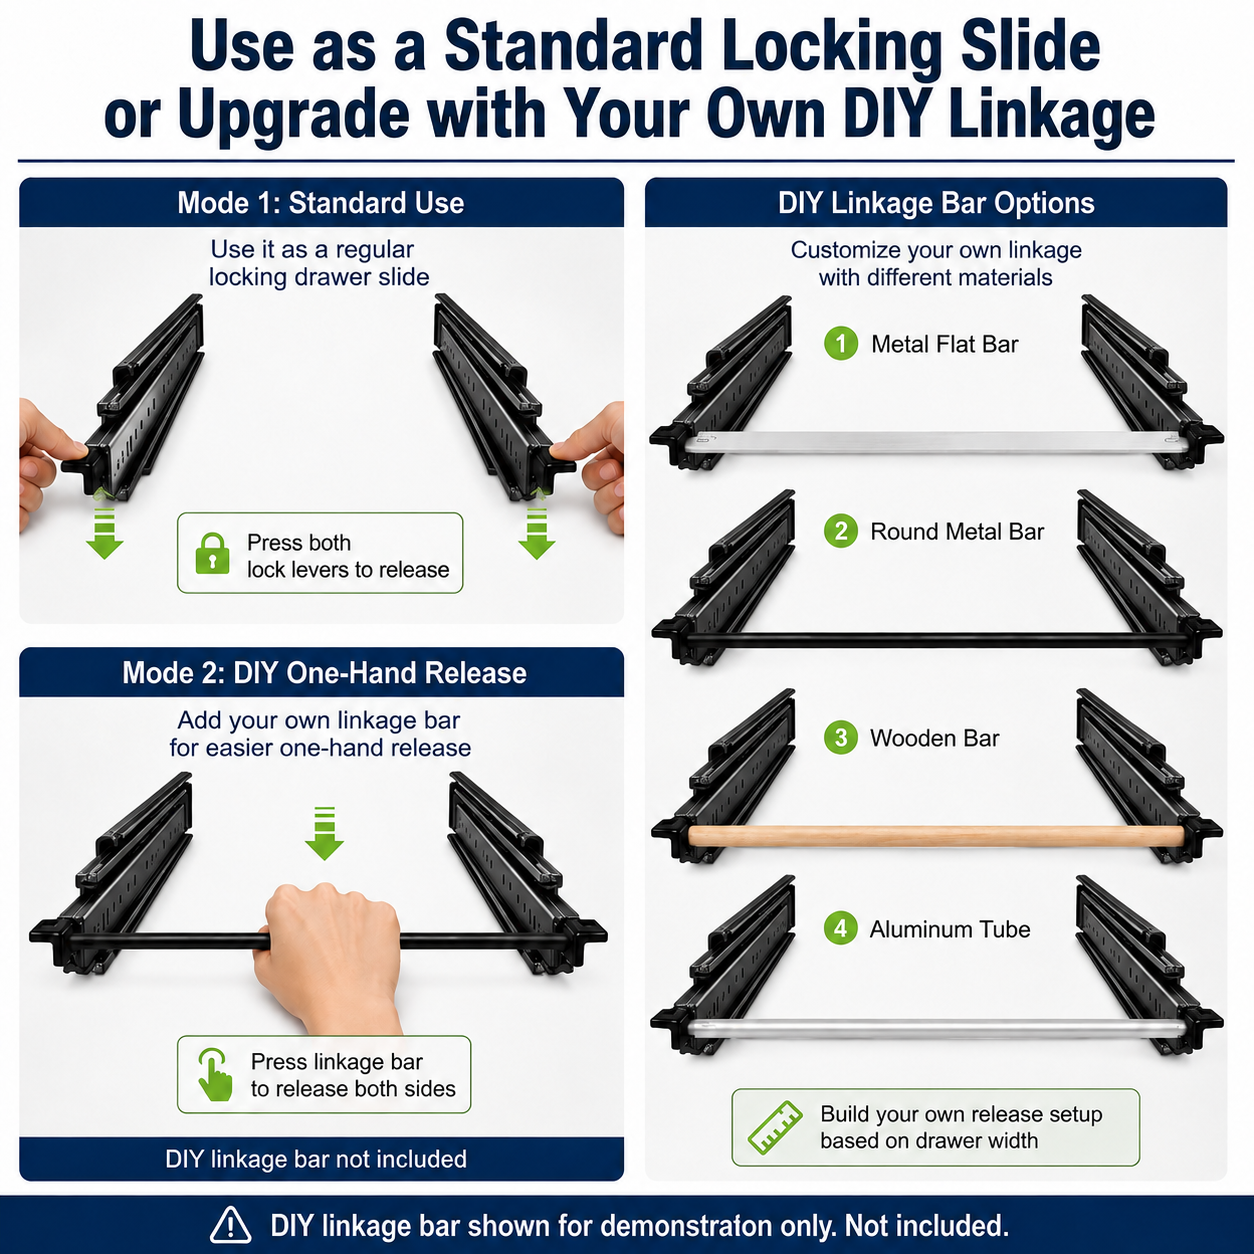
Our 76mm L2576 slides work normally with the two L-shaped levers as supplied. If you want one-hand operation, connect the two lever holes with your own bar, tube, rod, wood member, cable, or another mechanism. The crossbar is not included with the slides.
The reason we treat the linkage as a DIY part is practical: a van drawer, SUV drawer, fridge tray, pickup-bed drawer, and workshop pull-out can all use the same slide length while having completely different drawer widths. There is no single bar length that makes sense for all of them.
Before you start
Mount the slides first. Measure the linkage second.
Before building your DIY linkage, make sure the slides are already mounted correctly and aligned. This sounds obvious, but it is the step that prevents most of the frustrating problems later.
- Measure only after the slides are installed. The final distance between the two lock levers depends on your drawer width and the real mounted position of both rails.
- Measure from hole center to hole center. That gives you the most repeatable reference for the linkage geometry. If your end fittings add length, subtract their offsets before cutting the tube itself.
- Leave a little room for adjustment. A rigid bar cut too tight can preload one lever, keep one side partly released, or make the drawer bind.
- Deburr every cut edge. A fresh hacksaw cut on steel or aluminum is sharp. Clean the edge before you install inserts, touch the tube, or route it near wiring and cargo.
- Test the release with an empty drawer first. Both sides should release smoothly and return to the locked position before you add the real load.
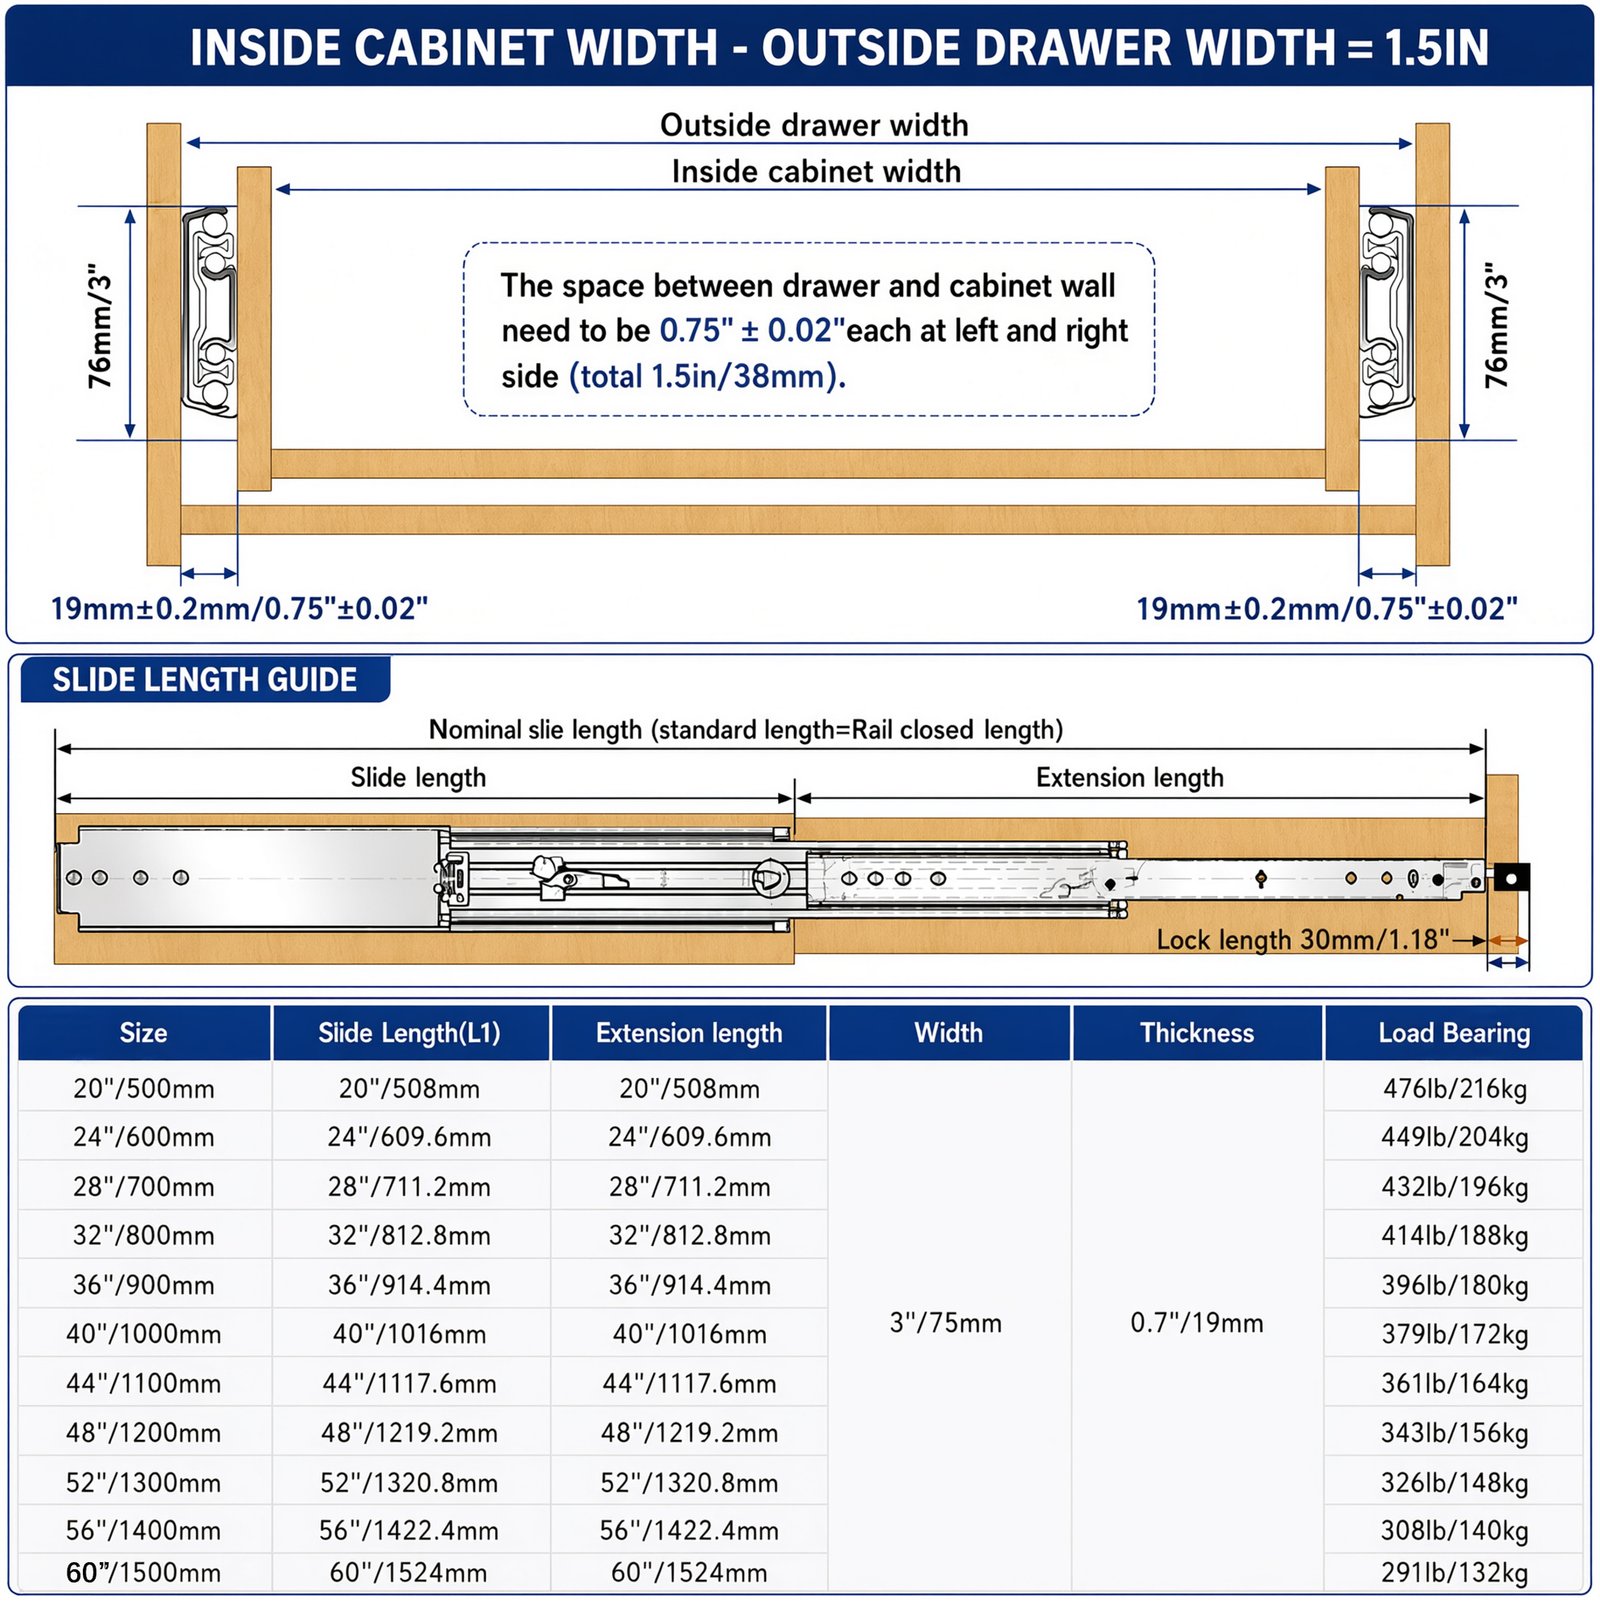
- Keep the slides side-mounted. The 76mm L2576 family is a side-mount slide. Do not lay the pair flat under a shelf and reuse the side-mount load rating.
Why builders link the two sides
On a wide drawer, reaching both lock tabs is usually the awkward part.
With two independent locking slides, you normally have one release point on the left and another on the right. That is fine on a narrow drawer. On a wide van drawer or truck-bed drawer it gets annoying quickly: you stretch across both sides, pull from one corner, and the drawer can start moving before the opposite lock is fully released.
A linkage moves the release point to one place. It can be a simple straight bar across the front, a centered handle, or a flexible cable routed somewhere easier to reach.
Two real-world reference designs
Before making your own, it helps to see how other builders have already solved the same problem.
These are not COREAX accessories and we are not claiming that their parts fit our slides. We are showing them because the thinking behind both products is useful: standardize the ends, let the builder cut the middle to width, and keep the job simple enough to do with ordinary workshop tools.
Reference 1: Selectlok 3076-LBAR
This is the closest market reference to our 76mm heavy-duty slide because Selectlok also builds its kit around a heavy-duty locking slide family and a cut-to-width crossbar.


Original product images: Selectlok Australia, 3076-LBAR product page. Shown here for design reference.
What Selectlok is doing
The kit is built around a 1,000mm long, 12mm outside-diameter mild-steel tube. The builder cuts that tube down to suit the drawer width. At the two ends, Selectlok supplies the parts that matter for repeatable operation: two lever sets, stainless fixing hardware, and nylon bushings.
That is the useful design idea. The width is the variable, so the width stays DIY. The lever pieces and the tube-end connection are standardized.
What I would borrow for a COREAX build
Not the Selectlok lever itself — our L2576 already has the L-shaped lever and the 5mm linkage hole built in. The part worth borrowing is the tube + replaceable end fitting/bushing idea.
For a clean COREAX setup, you could cut an aluminum or steel tube to width, put a suitable threaded insert, press-fit insert, or expansion-style tube bushing in each end, and fasten those ends through the two COREAX lever holes. It is simple to explain, easy to service, and does not require welding.
Reference 2: Kimberley2Cape Drawer Slide Handles
Kimberley2Cape takes a more DIY-first approach. Their product is aimed at builders who already have medium- or heavy-duty locking slides and want to turn two separate release tabs into one crossbar release.


Original product images: Kimberley2Cape 4WD & Adventure Accessories, Drawer Slide Handles product page. Shown here for design reference.
What Kimberley2Cape is doing
Their kit uses a pair of glass-reinforced nylon handles, an aluminum crossbar tube, two small retaining screws, and two larger screws that fasten the bar to the handles. The handles have several height positions for the bar, which gives the builder some freedom to clear the drawer face or surrounding structure.
The interesting part is the tube-end connection. Their installation instructions have the builder measure the gap after the handles are installed, cut the aluminum tube square, then drive the larger screw into the end of the tube to form an internal thread in the tube’s reinforcing fins. The screw is removed again and then reinstalled through the handle into that newly formed thread.
They also deal with something that often gets missed in DIY hardware: small fit differences. Because their molded handles are meant to work across several slide brands, they suggest using a polymer adhesive in the handle cavity to take up unwanted play. They also call out return-spring alignment on some release tabs and warn builders to check that the crossbar has returned to the latched position before travel.
What I would borrow for a COREAX build
Again, I would not copy the molded K2C handle. COREAX already gives you a purpose-made hole in each L-shaped lever, so you do not need an adapter that wraps around the original release tab.
The useful idea is the cut-to-width aluminum tube with a direct screw connection. If you choose a tube section with enough wall thickness or internal ribs to take a thread reliably, this can be a very clean DIY solution with fewer parts than the insert method.
DIY directions for COREAX L2576
Those two references are good starting points, but they are not the only ways to connect the two levers.
If this were my own drawer, I would start with one of the first two metal-tube methods. They give the neatest result and are easiest to adjust. But if you are prototyping, building with basic tools, or need flexible routing, there are other workable options.
1. Hollow tube + threaded insert / bushing
Best for: a clean, serviceable metal linkage.
This is the direction most similar to the Selectlok concept. Cut an aluminum or steel tube to width, fit a mechanical insert in each end, then use the COREAX lever hole as the bolted connection point.
For the end piece, look for a tube insert, threaded insert, well-nut-style expansion insert, or another bushing designed for the actual inside diameter of your tube. Do not simply grab a random wall anchor and assume it will stay put in a vehicle drawer.
- aluminum round tube
- mild-steel round tube
- stainless tube for wet environments
- threaded or expansion-style tube inserts sized to the tube ID
- clean appearance
- easy to remove later
- no welding needed
- easy to replace a damaged bar without changing the slides
2. Aluminum tube + direct screw
Best for: the fewest parts and a very approachable DIY build.
This is the Kimberley2Cape-style idea. Instead of putting a separate insert in the tube, use a suitable aluminum tube and create the thread directly in the tube end.
The key word is suitable. K2C can recommend this because their tube and screw are designed as a pair. If you try it with very thin generic tubing, the screw may strip the tube, pull out, or sit crooked.
- 01Test the idea on a short offcut first
Make sure the screw can form a usable thread without splitting or distorting the tube.
- 02Cut the real tube square
A crooked end makes it difficult to start the screw straight and can leave one linkage end longer than the other.
- 03Drive the screw straight along the tube axis
Form the thread, back the screw out, clean the end, then assemble it through the COREAX linkage hole.
- 04Recheck it after cycling
If the screw starts loosening or the tube end deforms, change the connection rather than simply tightening harder.
3. Flat bar method
Best for: a rigid linkage when drilling two accurate holes is easier than preparing tube ends.
A flat aluminum or steel bar is very straightforward: cut it to length, drill a hole near each end, and bolt it to the two L-shaped lever holes. You can also slot one hole slightly if you want a small amount of adjustment.
- very rigid
- easy to drill
- easy to inspect
- slotted adjustment is simple
- sharp corners
- bar flex on very wide spans
- interference with the drawer front
- over-tightening the lever joint
4. Wooden bar or dowel method
Best for: quick prototyping and easy garage DIY builds.
This is probably the fastest way to prove the idea before you spend time making a metal linkage. Use a hardwood dowel, square wood strip, or shaped wooden connector. Drill the ends and fasten it to the lock levers. If you want, you can also add a center grip so the piece feels more like a release handle.
- hardwood dowel
- square hardwood strip
- shaped wooden handle
- cheap
- easy to cut
- easy to drill
- great for testing a handle position or bar height
- not as durable as metal
- can split around the fastener hole
- can change with moisture
- looks more homemade than a finished metal bar
A very good choice for an early prototype or a personal workshop build. If it works well and you like the geometry, you can later remake the same piece in aluminum or steel.
5. Cable or cord method
Best for: flexible routing, mock-ups, or builds where a straight bar cannot pass across the drawer.
A cable can connect the two lever holes and route around structure that a rigid bar cannot clear. For a quick proof of concept, even strong cord or paracord can show whether the handle position works.
For a permanent vehicle build, I would move from simple cord to a properly terminated cable system with controlled tension and a reliable return. Flexible linkages introduce stretch and lost motion, so you need to make sure both locks really release and, just as importantly, both return completely.
Measure and cut
Center-to-center is your reference. The actual tube cut length depends on the ends you choose.
Once both slides are installed and working normally, put both levers in the same locked position and measure from the center of the left linkage hole to the center of the right linkage hole.
If your tube connects directly at those centers, that measurement is close to the finished linkage length. If you are using inserts, end brackets, spacers, or molded connectors, subtract the length that those parts occupy before cutting the tube.
Do not chase a perfect number on paper before the slides are mounted. The actual frame decides where the levers end up.
Basic tools
You do not need a machine shop for the simple versions.
A practical build sequence
Do the simple checks in the right order and the linkage is much easier to tune.
- 01Install both slides and the drawer
Get the basic rail alignment right before you add any linkage.
- 02Operate both lock levers separately
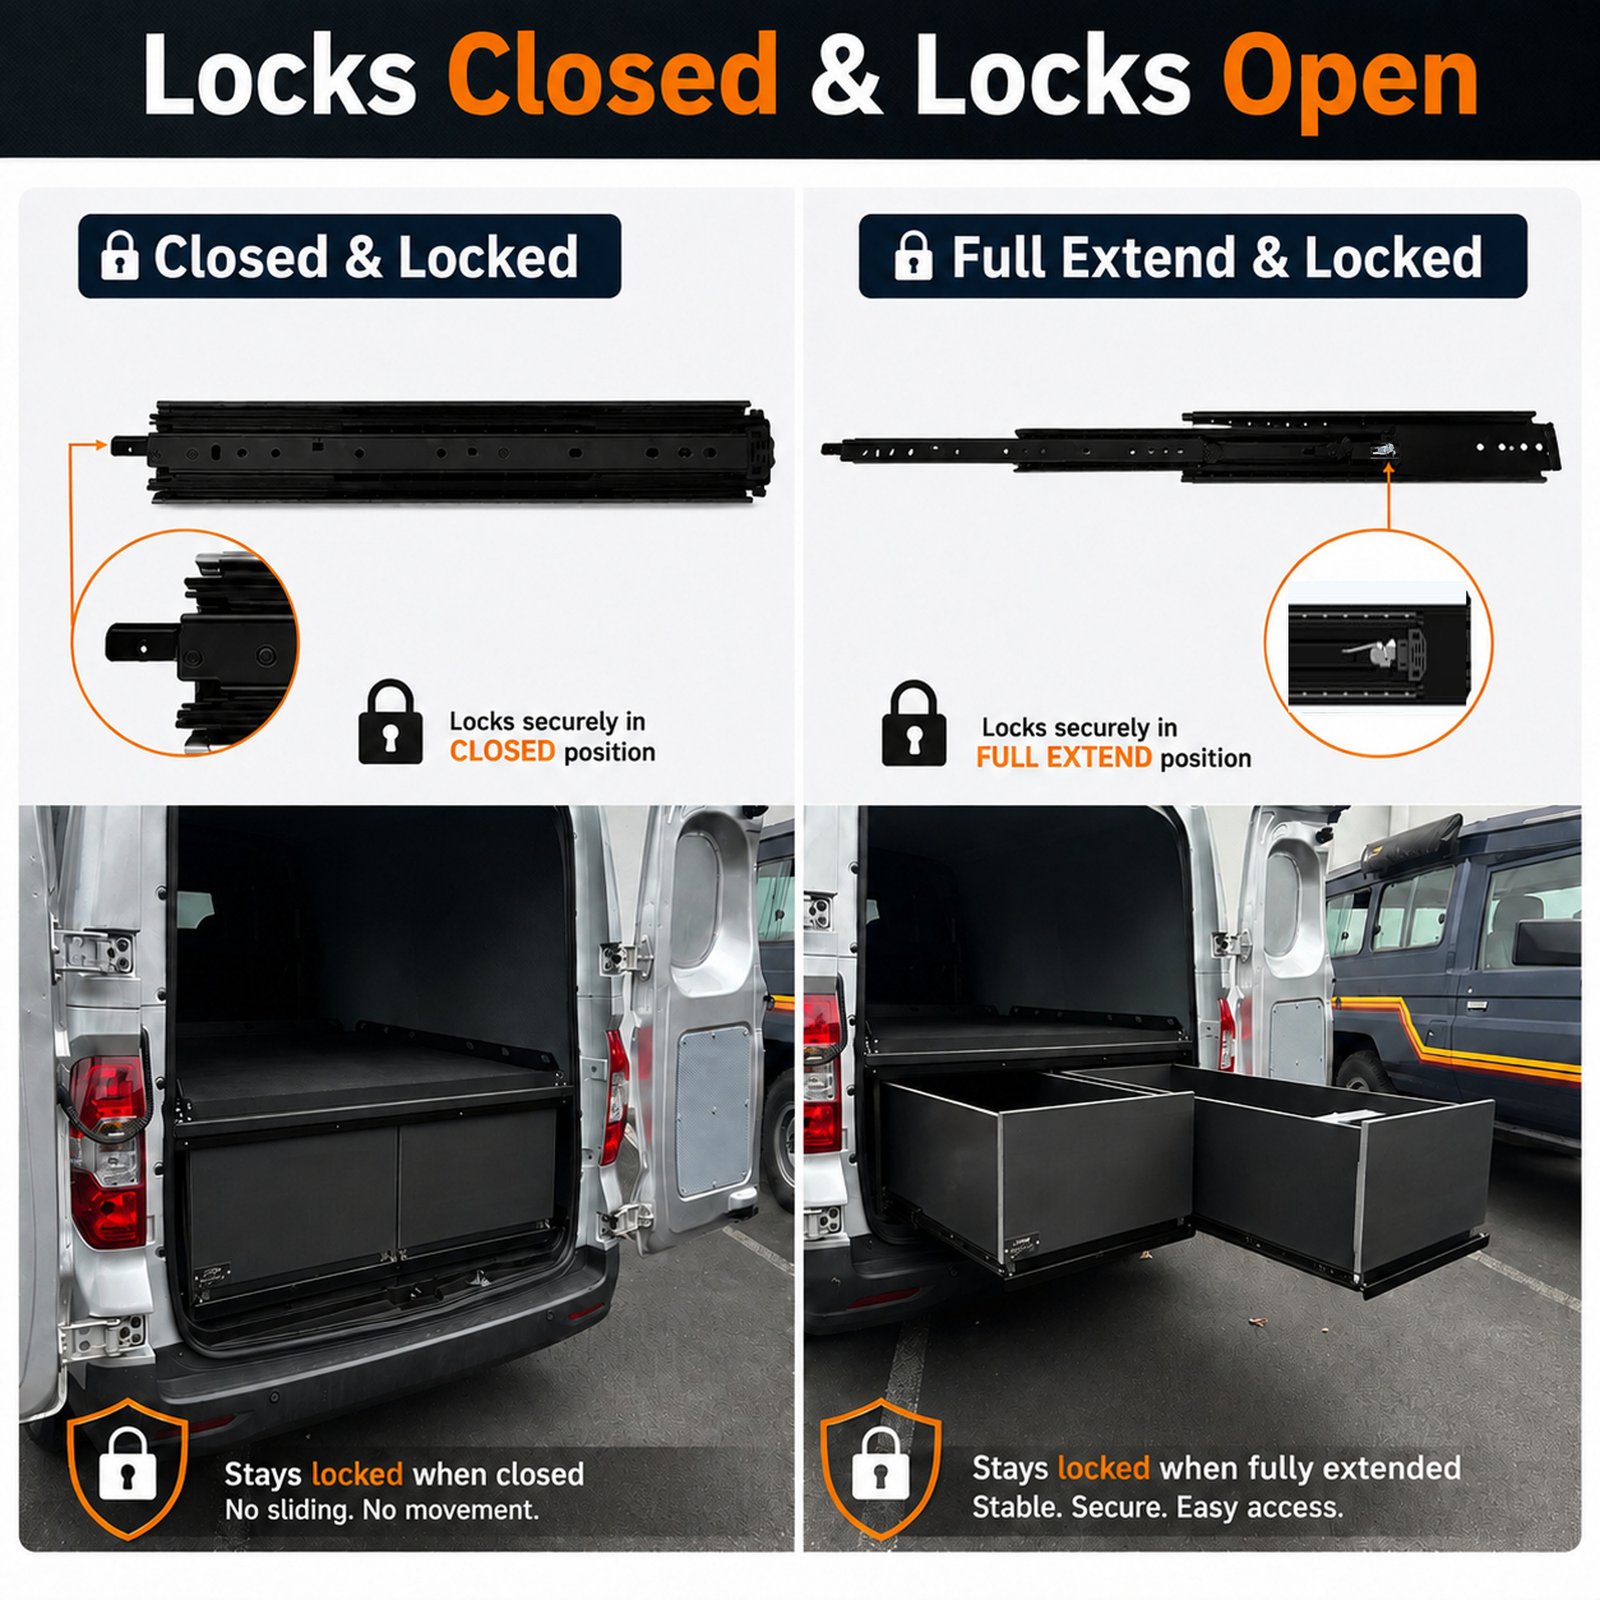
Make sure each side locks closed, releases cleanly, and locks again at full extension.
- 03Measure hole center to hole center
Take the measurement with both levers sitting naturally in the same locked position.
- 04Choose the connection style
Tube insert, direct-screw tube, flat bar, wood, cable, or another method that suits your tools and drawer layout.
- 05Cut the linkage and deburr it
Keep the cut square. If you are using end fittings, account for their length before cutting.
- 06Attach both ends loosely
Do not tighten the linkage while one lever is sitting higher or farther forward than the other.
- 07Check simultaneous release
Move the bar slowly. Both sides should disengage at nearly the same point without one side being dragged by the other.
- 08Check the return
Let go of the bar and confirm both levers return freely. The linkage must not hold either lock partly open.
- 09Tighten and cycle it repeatedly
Run the drawer open and closed several times while empty, then recheck every fastener.
- 10Test with the real drawer load
Only after the empty test passes should you load the drawer and check whether frame flex changes the release or locking behavior.
Release bar vs drawer handle
I would still give a wide heavy drawer its own centered pull handle.
This point is worth separating from the rest of the guide because it is easy to miss. The linkage only needs to move the two lock levers. Pulling a large loaded drawer puts a different and usually much higher load into the bar and its end joints.
Selectlok makes the same distinction in its own product guidance: their locking bar operates the release tabs, while the drawer should have a dedicated grab handle.
There is another practical benefit. On a wide drawer, pulling from the center helps keep the drawer square. Pulling hard from one corner is one of the easiest ways to make a long drawer feel rough even when the slides themselves are aligned.
Final test
Do not stop at “it unlocks.” Make sure it also locks again.
Examples from other builders and hardware suppliers
The two reference links used in this guide.
External examplesIf you are planning your own crossbar, both of these pages are worth looking through slowly. Selectlok is the cleaner reference for a productized tube-and-end-fitting system. Kimberley2Cape is the better reference for a hands-on DIY installation with common tools.
- Selectlok 76mm / 227kg Locking Bar KitClosest reference to a 76mm heavy-duty slide. Pay attention to the cut-to-width steel tube, standardized lever ends, bushings, and separate pull-handle recommendation.
- Kimberley2Cape DIY Crossbar KitUseful DIY reference. Pay attention to the aluminum tube, screw-formed tube-end thread, adjustable bar height, fit adjustment, and measure-after-install workflow.
Compatibility note: the images and products above are third-party examples. COREAX does not claim that Selectlok or Kimberley2Cape parts fit L2576. Use their products to understand the design ideas, then build and test a linkage around the COREAX lever hole and your actual drawer geometry.
COREAX L2576
The slide already gives you the connection point. You decide what goes between the two sides.
COREAX L2576 is a 76mm-profile side-mount locking slide family with full extension, lock-in and lock-out, and inward-facing L-shaped lever holes for custom linkage work. The linkage bar is not included. That lets builders set the final release around the actual drawer width rather than adapting the whole drawer to a fixed bar.
Common questions
DIY linkage FAQ
Does the COREAX L2576 include a linkage bar?
No. The slides include the two linkage-ready L-shaped lock levers. The bar, tube, rod, wood member, cable, end fittings, and other linkage parts are builder-supplied.
Are the Selectlok or Kimberley2Cape kits compatible with COREAX?
We have not claimed or tested direct compatibility. They are shown here as useful design references. COREAX already has its own linkage hole, so the main ideas to borrow are the cut-to-width bar and the way each supplier handles the two bar ends.
Which DIY method would you start with?
For a finished vehicle or heavy drawer, I would first look at a metal tube with a proper insert/bushing or a suitable aluminum tube with a tested direct-screw end. Flat bar is also very practical. Wood is excellent for prototyping. Cable is useful when a straight bar cannot clear the structure.
When should I measure the linkage?
After both slides are installed, aligned, and locking correctly. Measure hole center to hole center with both levers in the same natural locked position, then account for the end fittings before cutting the bar itself.
Why leave some adjustment instead of cutting the bar perfectly tight?
Because a rigid linkage that is even slightly too short can preload the levers and stop one lock from returning fully. Small adjustment also helps compensate for real-world frame tolerance.
Can I use a wooden dowel?
Yes, especially for a prototype or a light-duty personal build. Hardwood is easy to cut and drill. Just remember that it can split, flex, or change with moisture, so metal is usually the better long-term choice for a high-vibration vehicle installation.
Can I use rope or cable?
You can use cord for a quick proof of concept and a properly terminated cable for flexible routing. The challenge is stretch, lost motion, and return tension. Both locks must release and re-engage completely.
Can the linkage bar also be the drawer pull handle?
Do not assume it can. A release bar and a structural pull handle see different loads. For a wide or heavy drawer, a separate centered grab handle is the safer and usually smoother setup unless your linkage has been designed and tested to carry the pulling load.
Can the 76mm slides be mounted flat under a platform?
No flat-mount rating is published for L2576. Keep the pair side-mounted on vertical faces and use the size-specific side-mount load data for the selected length.